Saturday, December 22, 2018

Anouncement


Hello My Craft Friends,

It's almost the end of year. I like to cheers with all my friends.

From January 2019 I will start to post my creative to my new blog home https://sunnyscraft.wordpress.com/. 
I am working for transferring old post to new home.  Hope WordPress give me great experience.
 
I hope you continue to follow me in my new blog home and give me more suggestion.  

Also I will take a break from tomorrow to new year. I want to spend more time with my family at this winter break.

Merry Christmas and Happy New Year!

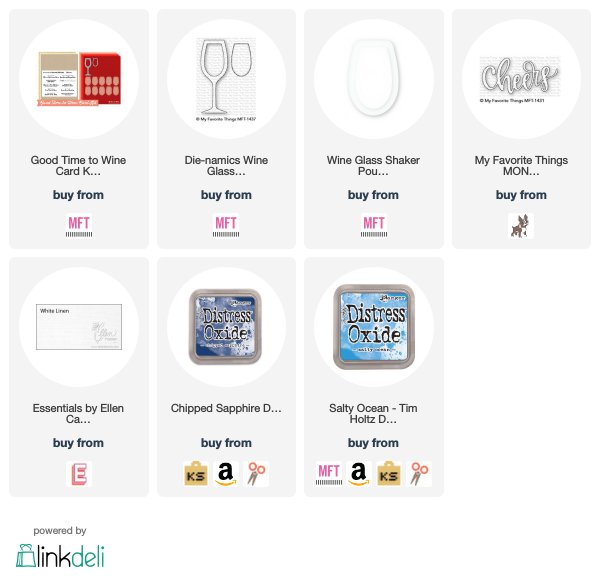
Above card that I made from My Favorite Things New card kit. The kit is sold out so quick. But the individual items still available in store. Glitter paper for sentiment is from local craft store.

Wednesday, December 19, 2018

White Embossing Trees


I still need holiday card to mail. So I decided to make another watercolor holiday card.

I used my new Arteza 36 watercolor pan to color the background.  I chose Magenta(A252), Violet(A374), Lavender(A395), Oxford Blue(A382) and Indigo(A385). I wet  the all paper and layered the color more and more.

After dry, I embossed the trees by white embossing powder. I also used the Versarmarker pen  to draw some dot and embossed them.

Then sentiment is from Hero Arts.

Supplies that I used:

Monday, December 17, 2018

Christmas Card by Creative Stamping 62

Another magazine that I bought from book store. Creative Stamping always include the all sheet of stamps. It's great to make scene card.

I stamped the house on the white card panel first. I made a mask for this house and stamped the tree behind of it. Then I started to sponge night sky. At behind of house, I added the soft yellow on the sky.

I cut the mask paper to make the snow hill and stamped the deer on the lower of front card. I embossed the sentiment and stamped the snow on the sky by white ink pad.

I used the color pencils to color the house and tree. I also added the shadow under the deer. Don't let deer floating on the air.

I entered my card to A2Z winter woodland challenge and SSS Wednesday challenge

Supplies that I used:

Saturday, December 15, 2018

Watercolor Christmas Card


Winter/Holidays season always give me a lot of idea to make my project. Today I tried to draw plants/flowers in a snowy day. I chose the watercolor to make this card.

I used the wet to wet technique on the watercolor paper. I mixed the white and yellow to light the color and brushed it on all of panel. Then I drew the blue color from left lower to center, also from right upper corner to center. I layered many times color on the card. I dry the paper between each layer.

After I was satisfied the background, I started to drew the plants by Arteza Real Brush Pen. This is easy way to draw the branches. Then I used the Q-tip to add the white pigment ink around the branches. Also I splashed the white color on the card to make the snowy sky.

At the end, I sprayed the shimmer on the card. I die cut it to circle after dry.

Sentiment and circle die are both from Hero Arts.

I entered my card to SimonSaysStamp Wednesday Challenge  and A2Zscrapbooking monthly challenge

Supplies that I used:

Wednesday, December 12, 2018

Winter Snow


My daughter really hope we have snow every year. But this is not guarantee for North of Texas. So I decided to make a snow card for her.

At first I added the Crystal Brusho Powder on the watercolor paper and sprayed the water on it to make a dark blue frost background.

Then I used the Stampin Up Beautiful Blizzard snowflake die to make a stencil and added the shimmery white embossing paste on it. I got those beautiful snowflake.

I die cut the winter snow sentiment on the silver glimmer paper.

Supplies that I used:

Monday, December 10, 2018

Deer in the Winter Woodland

I saw this embossed technique couple years ago. But I never try it. I thought winter is perfect time to try this technique.

I added the sand and light blue color directly on the embossing folder. Then I stamped the deer on the embossing folder too. After this, I put the white cardstock between the embossing folder and went through the Big Shot.

I got the all embossing image on the card, but the color was too light. So I used the marker to draw the deer. Then I sponged the sky and ground. At the end, I used the brayer to add the light grey color on the tree trucks.

I entered my card to A2Z Scrapbooking monthly challenge.

Supplies that I used:

Friday, December 7, 2018

Snow What Fun!


I got the Altenew 36 watercolor set on black Friday sale. I tried it out today. I built many layers for night sky. Company professional watercolor, this is a little hard to built layers. But not too bad for card making.

I used the snow stencil and unicorn white ink to add the snow on the sky.

I used the mask paper to build my cute snowman. then fussy cut it out.

I used the leftover snowflake from last card to glue on the sky to make balance.

Supplies that I used:

Wednesday, December 5, 2018

Dashing Deer in Snowy Day

I accidentally ordered  this Dashing Deer stamp set on wood mount. It was so bad for me because it's hard to stamp crispy on watercolor paper once time. Normally I like to stamp multiple time by Stamparatus to get crispy image.

It's as expect I didn't get the crispy image for deer. For solving this problem, I used the black marker to fill the deer.

For background, I used the smooshing technique. After dry, I stamped deer and drew the ground by the same ink color.

I used the snow stencil and shimmer white paste to add the snow in the sky.

Supplies that I used:

Monday, December 3, 2018

Thin Die Cut Deer Christmas Card


Simon Says Stamp has this beautiful thin deer die. I die cut it on the silver shimmer card and glued the vellum behind of deer.

For background, I used the Crystal Brusho Powder on the white card stock. After dry, I stamped the trees background stamp on it by white unicorn ink pad.

I install deer and embossed the sentiment on the card.

I entered my card to Simon Says Stamp Wednesday Challenge and A2Z Scrapbooking  Monthly Challenge. 

Supplies that I used:

Saturday, December 1, 2018

Embossed Christmas Card

I always love to buy UK craft magazines from Barns and Noble. Yesterday when I was waiting my daughter's ballet class, I went to book store. There is a lot of new magazine for Christmas theme. I picked one: Papercraft inspirations 134.

The magazine includes one embossing folder and some stamps. The center of embossing folder is a snow globe and snowflake around. The Merry Christmas sentiment is below. The embossing folder size is 4.25 x 4.25.

I stamped the tree and deer on the white card stock. I colored it by Prismacolor color pencil. Then I used the Hero Arts circle die cut it out. It's perfect to match the snow globe that is on the embossing  folder.

I used my new Picket Fence life changing blender brush to add the colors on the embossing part on the card. Then I glued the colored deer circle on the snow globe.

Supplies that I used:

Wednesday, November 28, 2018

Happy holiday by Waffle Flower


This is very large stamp set. So I made 5 x7 size card instead of regular A2 card today. I am not good at coloring. But I was very enjoy it.

I stamped this image on the watercolor paper. I watered each area before I colored it. After all, I still wasn’t satisfied. So I decided to added some color by colored pencils.

After finished the coloring, I trimmed the paper to a quarter of inch smaller than 5 x 7 card base to leave a white border.

Supplies that I used:

Monday, November 26, 2018

A little girl by Picket Fence Studios


Every Friday when I am FaceTime with my parents, I like do something in my craft room, like to cut paper, organize room, open package etc.  This Friday was normal like before every week. I sat there and started to talk with my dad. After we exchanged all information about past week, we started to enter randomly talking. I began to look around my room to find what I could do today. I saw my packages.

It was a busy black Friday. I went to a lot of store to shopping. I didn't have time to open my online shopping package yet.  One of my package was from Picket Fence Studios. They shipped my order so fast. I am glad I got two bonus their blending brushes.

Couple days ago, I played with my Brusho powder. I put it on regular cardstock and glossy paper. I like it on the glossy paper. So I thought I could use one to make this simple card with this pretty simple line girl.

I picked one girl and sentiment. I stamped them on the card. I got a mistake that stamp stick some color from background. You can see from girl's back. But I didn't want to waste my beautiful background. So I decided to continue my work.

I used the black and grey watercolor brushes to add the shadow for girl and extend the ground.

At the end, I sponged the light green ink all around the four edges. The white butterfly is free gift from my Waffle flower order last time.

Supplies that I used:
 

Saturday, November 24, 2018

Fall leaves


I got up early for Black Friday shopping. It's big day for my daughter: happy shopping day!

We went out Thursday night and Friday morning. What's a busy schedule. I was tired. Now I sat there drinking coffee. I try to think past two day what I do where I go. The most impression for me is the falling leaves and bared trees when I left home at dusk.  Fall is over. Winter is coming.

I thought I could make the last fall card for this year.

I stamped the ground first by three generation stamp technique. Then stamped the falling leaves. Last was trees. I tried to make the fog dusk looking. So I used the light grey to add the sentiment. I used the blender pens to add the shadow for tree and truck.

I still felt my card need something. I decided to add some flying birds on the right corner.

Supplies that I used:
 

Wednesday, November 21, 2018

Happy Thanksgiving!


Happy Thanksgiving all dear craft friends!

This is simple card that just stamped background and leaves first. Then I die cut two frames to use foam tape to cover the stamp area.

At the end, I glued the die cut sentiment.

I entered my card to A2Z monthly challenge.

Supplies that I used today:

Monday, November 19, 2018

Snow Buddies (2) by HoneyBee


HoneyBee Snow Buddies stamp set has three snowmen. Today I used the third one to make another holiday card.

Like before, I sponged the blue sky by Distress Oxide Ink pad. And used the masking paper to made the snow hills.

I colored the all characters and die cut them out by coordinating dies. And I glued the earbud on the snowman head. I also installed the every characters on the card.

I entered this card to Simon Says Stamp Wednesday Challenge.
Supplies that I used on this card:

Saturday, November 17, 2018

Think of You card by Winter Woods Stamp Set


I love this such beautiful stamp set, specially this group of trees. It can make any occasion card.

Scene card is very beautiful and simple to make like today's card. I used the wide masking tape covered the top and bottom parts. I only left the upper space to make scene.

I punched the 1" circle on post notes for making moon. Then I started to sponge the night sky. Close moon part I sponged by light hand. Right upper corner I used heavy hand. I total used three blue color from Distress Oixde ink that I listed below.

I removed the moon mask to added the very light yellow color. Then I stamped the trees on the card.

After removed the all of masking tape. I stamped the sentiment on the lower white part.

Supplies that I used on this card:

Thursday, November 15, 2018

Holiday lights by Picket Fence Studios


After I saw Lydia used this stamp set make a beautiful card. I rush to get it on my hand. Very special stamp set.

I had a lot of beautiful paper from Claritystamp. I couldn’t stop to buy them again and again. Even I hardly used the designer paper. I loved Barbara’s design.

I thought I could make a simple card by using this beautiful north light paper for my card background. I just embossed the lights on the paper by black embossing powder.
   
Sentiment was from the same stamp set. But it's long-standing, couldn’t fit the left space. So I used the masking tape to cover one word each time to stamp them different lines. For sentiment I used the silver embossing powder.

Supplies that I used fro this card:

Tuesday, November 13, 2018

Hi, Friends


This is second card made from Stampin Up Winter Woods stamp. It's one of my favorite stamp recently. 
I stamped the oak tree trucks first. I also made the masking for oak tree trucks and covered it on. Then I started to sponge the light blue sky. I wanted made a winter day, so I didn't use the bright blue color. 

After I stamped the trees, I used the blend pens and grey ink color to draw the ground. 
I decided to add the frame for today's card.
Supplies that I used:

Sunday, November 11, 2018

Post Script Background Card

I bought this Post Script background stamp long time ago, but I still didn't have time to use it. I decided to use it today.

At the beginning, I cut the white panel at A2 size (4.25x5.5). And covered the four edges by masking tape. Then stamped the post script background on the card. After I took off the masking tape, I felt it is too plain.

So I cut off the white edges and used Altenew fine frames cover die. Then I used the foam tape to make every pieces to pop up.

I die cut two hearts and covered glossy accents to make the hearts shinny and 3D looking.  I glued them on the card.

Supplied that I used:

Thursday, November 8, 2018

Snow Buddies by HoneyBee


I made one more snowman Christmas card by HoneyBee today. This stamp set has three super cute snowmen. Those snowmen are bigger than normal. So I separated to make on my card. This is my second one. I believe I will make third one and more. I planned I will make them together on a large card in the future.

As the same yesterday card, I stamped the every images on the white card and colored them. Then I used the coordinating dies cut them out.

Today I used the new stitch three rectangle die to cut on the white card to make the window. This card is 1” large than normal A2 card because die is big.

I sponged the background by Distress Oxide Ink. Then I added some white dots by white gel pen on it. I installed the white panel on the background card by foam tape to make dimension.

Finally I installed all characters on the card.

Supplies that I used:

Wednesday, November 7, 2018

Wobble snowman by HoneyBee Stamp


I couldn’t believe I received those HoneyBee new release so quick. I was so excited. That night I couldn’t fall to sleep. I looked around the YouTube Chanel that I followed. Luckily I watched HoneyBee new release video. I was really like it. Then sent my order.

Those snow buddies stamp set is very large so I decided to make a wobble snowman card today. Last time I accidentally bought those regular size wobble pack. Those wobbles fit the this large snowman.

I stamped and colored this snowman and other small pieces. I used the coordinating die cut them out.

I used the new Deckle Edge rectangles die (second large one) cut a panel. I embossed snowflakes one the panel and sponged by Distress Oxide Inks. I also sponged the all edges.

I stamped sentiment under snowman.  I used two wobbles on snowman for balance. But I move the stick part for upper one to let it move flexibility.

Supplies that I used:

Monday, November 5, 2018

Night Ice Mountains

It's so fun to make this ice mountain. Four years ago, I took the cruise to Alaska. It's very impressive trip, specially when the ship drove to very close the glacier and airplane fly over Alaska. I can't wait to plan next land trip to Alaska in the near future. 

I learned this technique from Inkylicious YouTube video. It's very easy and simple.

I used sponge and brush to make this panel on the black cardstock. Just sponge and brush by the mountain shape mask.

Supplies that I used:

Sunday, November 4, 2018

Fall Folk Dance Card


This year fall is coming so early. I wore jacket in October and leaves started drop. It’s time to make fall cards.

I sprayed yellow and orange color from Lindy’s Stamp Gang on the watercolor paper. This spray includes shimmer. Very beautiful colors.

After dry, I used Simon Says Stamp Folk Dance die to cut it. I chose the black cardbase. I also die cut the border sentiment from Simon Says Stamp new die too.

I also added three die cut leaves my stash. This is totally no stamp card.

I entered this card to SSS Wednesday Challenge and  A2Z Monthly Challenge.

Supplies that I used:

Thursday, November 1, 2018

Just Saying Hello

We had bad weather yesterday. It was cold and rainy. But today is beautiful sunny day. I sat at front of window and looked outside. I very enjoyed this great and peaceful time.

I cut a 100% white watercolor paper and started watercolor. I really love my MaieriBlu watercolor. I chose the Primary blue cyan, Ultramarine light and Prussian blue.

After this panel dry, I decided to stamp the trees to make the forest. I used the Visible Image stamp Into the Woods. I stamped far trees by light grey color. Then I stamped the front trees by black color.

Supplies that I used:

Tuesday, October 30, 2018

Birthday Card by Enjoy Life stamp set


It's very enjoy to use the left pieces from other project. Today's card I made with the left over from the window die cut. The four rectangle pieces are from the window cut left.

I used the removable tape to stick those four pieces together on the copy paper. Then used the acrylic block to add the color on it until I liked them.

After dry, I stamped the plant on it. I also stamped the same image on the white card that I cut it to 4x5.25. Then I moved the four pieces of rectangle from copy paper and re-glued them on the white card. This time I need pay attention to make the plant matching together. It looks the same stamp once.

Supplies that I used:

You may also like:

Related Posts Plugin for WordPress, Blogger...