Thursday, August 31, 2017

Silent night made by hearts come home bundle (link updated)


Today is the last day for our #team15in15 challenge on Facebook group.  Card No.15 I chose stamp bundle "Joy to the world" from the new Stampin Up holiday catalog that is available to public tomorrow.  This stamp bundle was abstracted me when it showed on the first release show. They has very cute house die.

I made a shaking card today. At first, I sponged colors to make a night sky. I used the brush to splash white color on the card. I also cut some stars on the sky by the star die in the same bundle.

I die cut the two different houses line. I glued the short one on the background. And I die cut the frame and added the acetate on the back of frame. Used Stampin Up stripe Foam tapeto made the shaking card. This foam tape is precut very thin and enough thick for shaker card. After I started to use it, I like to make shaking card. So easy.  All star sequins was bought from local Michael 's store.

I glued the second die cut house and church in the front. I feel too plain of my card. Also I didn't know where I added the sentiment. So I stamped sentiment on the white cardstock and fussy cut. I decided glued the sentiment on the right upper corner.

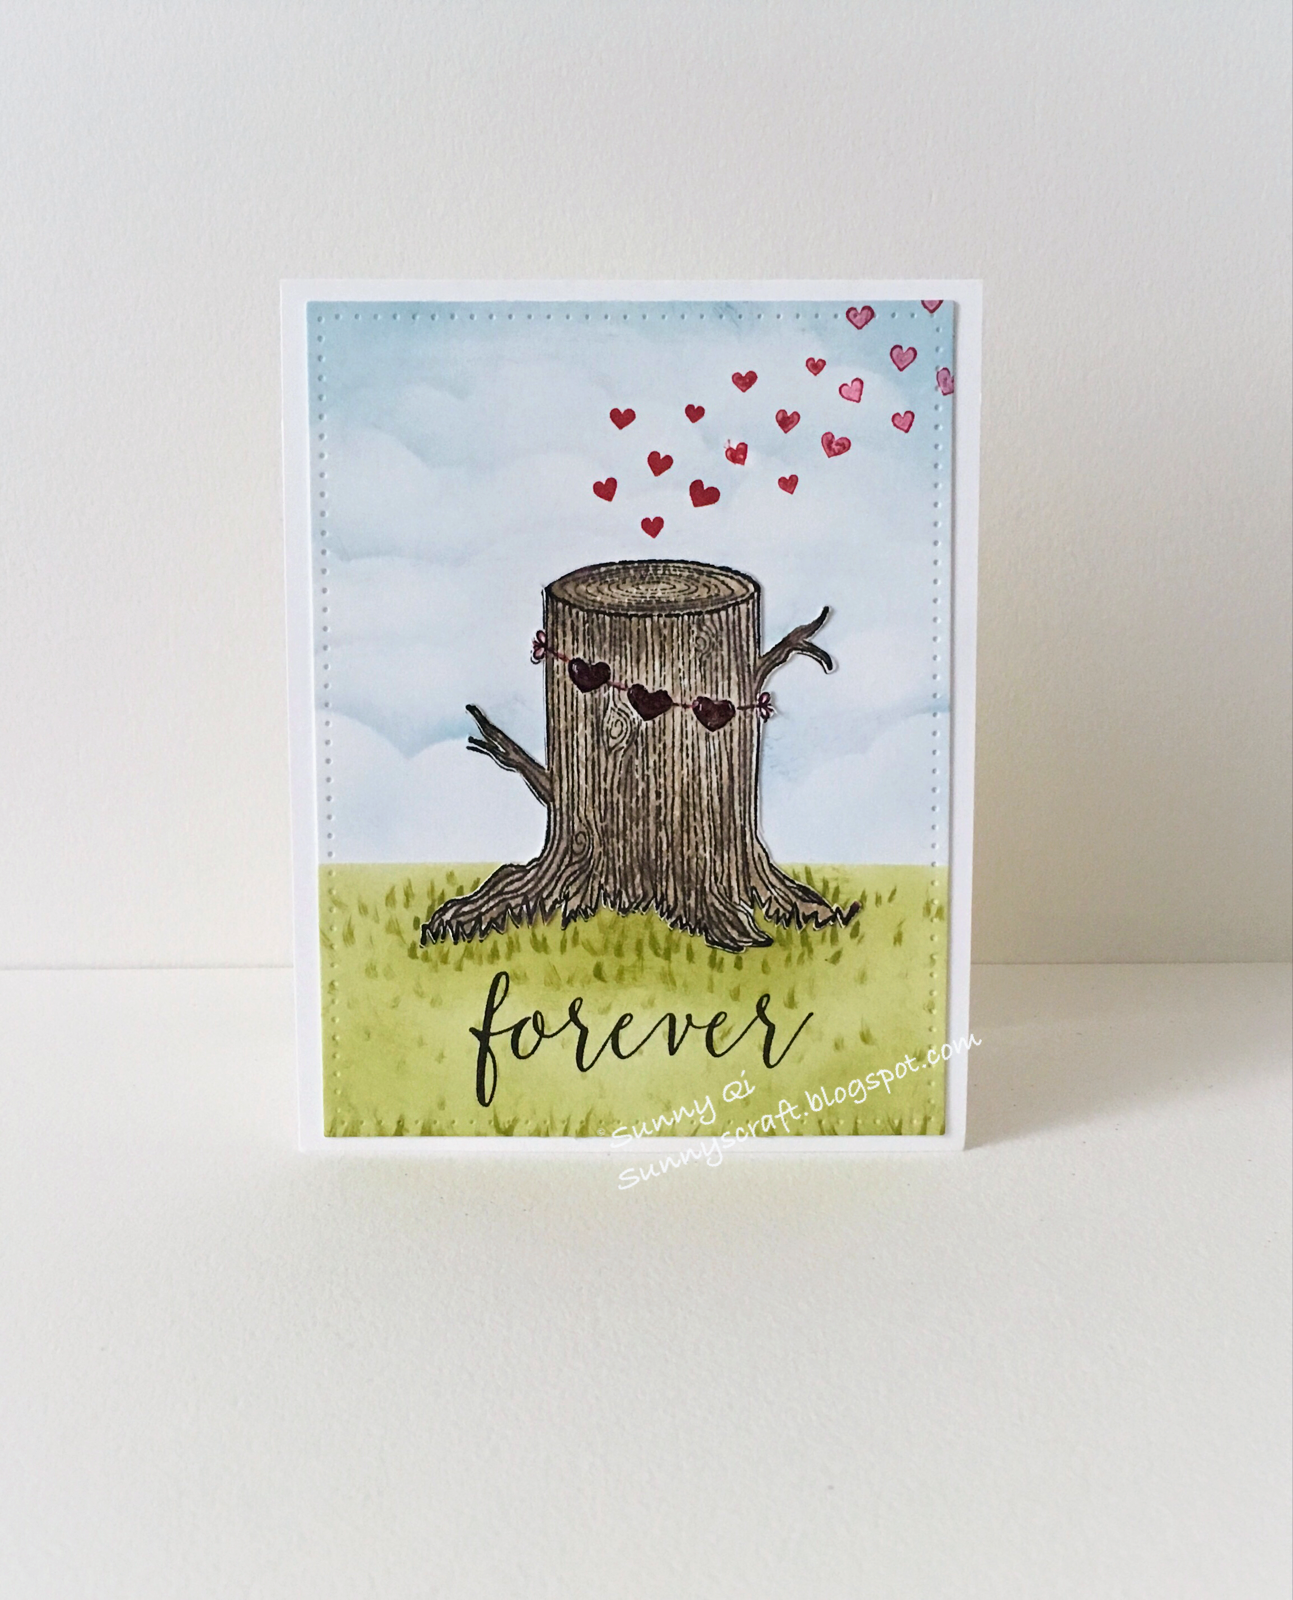
This is my card today. The stamp bundle will be available tomorrow. So I will update purchase link tomorrow.

Supplies that I used:
Joy to

Wednesday, August 30, 2017

Hi, Sweet Friends


When I was looking around on eBay, I found a lot of retired stamp sets I liked so much. I felt I entered an antique store. Today's card I used this Winged Things stamp set was 2005 Stampin Up! set. Also the sentiment I used MFT retired Label Maker Love stamp set ( I added the link for this stamp set, maybe some place still has it in stock).

I sponged background first by perfect plum, elegant eggplant, pink pirouette and daffodil delight. Then I stamped butterfly and snail on the card. I drew a black line under snail to make ground. I didn't want he floating in the air.

I cut pieces of post note to cover the butterfly and snail.  Then I splashed some purple color on the card by watercolor brush. I also stamped some texture by Kaisercraft Hessian stamp.

I started to color snail and butterfly. This time I used Copic Qtyou spica glitter pen to color the images. After done the color, I added the shimmer on the butterfly's body.

I stamped the sentiment on the card.

I used the black marker pen to add the edge of card. I drew the lines along the card to make a large rectangle frame first. Then I drew the short lines to cut the small space. I added the black color to every other space by Uni Posca pen marker.

I mounted the card to the heavy weight cardstock.

Supplies that I used:


Tuesday, August 29, 2017

I will be by your side

I am still working for #team15in15 challenge. This is my card #13. All other card, please check my Facebook page.

Today's card I use the Stampin Up! High Tide stamp set. I stamped the sand and sea wave at first. Then I stamped the birds and grass. I used the Q-tip to add the color under the birds and grass.

I sponged the Pacific Point for the sky. I stamped the sentiment and flying seagull.

I added the white frame on the card to make depth of focus. The frame was I used the leftover that made from MFT pierced rectangle frame. I used two of large frame die to cut together and got the between the thinner frame.

A lot of stamping was on this card. But it was easy to make. Hope you like it. Thank you for watching.

Supplies that I used:


Monday, August 28, 2017

Text fun


I got this text ya later stamp set over a month. I thought I should to use it make some card. It's really fun stamp set.

My style is simple and clean. So I followed my style to make today's card. I stamped text frame on the card that I die cut by Lawn Fawn stitched rectangle die. I added the different lengths of text bubble frames in the text screen. Then stamped different colors on it. At last I stamped the text on it.

I felt a little plain of my card. I glued some hearts and stars sequins that bought from local Michael 's store on the card. Also I sponged the night of navy on the cardbase. Finally I used the foam tape to mount the card on the card base.

Supplies that I used:

Friday, August 25, 2017

I'll always be here for you


Hot glue paint is sooooo fun. I can't stop to use it making card. Couple days ago I made one Joy to the world. Today I decided to make another one.

Today's card I used the Nuvo embellishment mousse to make the background. Then add some other colors. At first, I took some mousse paste on the craft sheet and added some water. Blend well. Put the watercolor paper on it.  If you like, you can tap the paper to get more paste until you are satisfied.  Let it dry naturally or using heat gun.

After it was totally dry, I dropped the hot glue on the card surface. Then I used some Stampin Up! ink as watercolor to add the colors on the background and hot glue. For background first, then hot glue.

Waiting it dry again. Then I die cut the card to square and glued on the cardbase.

Stamped the sentiment. Done! It's simple but beautiful. I really like to color hot glue part.

Supplies that I use:

Thursday, August 24, 2017

Autumn pumpkin


Although it is still hot outside, I started to feel a hint of autumn's air. My daughter always loves autumn because it means holiday season is coming. One of her favor holiday Halloween is around corner. Decorate pumpkins is main part of her autumn things.

Stampin Up! has a great holiday catalog this year. It's available for purchasing on Sep.1, 2017. Demonstrator can buy them on August. This Ground Goodness is  one of what I bought new stamp sets.

This card was quite simple to make.

I used the tangerine tango to stamp the pumpkin and mixed the tangerine tango with daffodil delight to stamp the leaves. Then I fussy cut all pumpkins and leaves.

I got the embossed cardstock from Lydia Fiedler. Thank you, Lydia! I sponged the old olive on the embossed card under the pumpkin and leaves. Just extend a little to outside.

I used the white embossing powder on the black card. And cut to banner. Then I arranged all pieces on the card. Some pieces I used glue, some I used foam dimensions. I add the gloss accent on the pumpkins.

Final thing is mount card on the elegant eggplant cardstock.

Supplies that I used:

Wednesday, August 23, 2017

Enjoy the warmest of the season


Now it's the hottest weather in here. Before every year it was hot but dry here, but this summer was hot and humid. I felt I can't breathe. So today I decided to make a winter card let me feel cool temperature.

I used stamp set is from Stampin Up new holiday catalog. It will be available for public on September  1,2017. If you like to become a demonstrator now, you can order now. I will update the purchase link when it is available for everyone.

Tiny house die I used Stampin Up retired die from last year. You can't purchase it on Stampin Up website but if you lucky, maybe you can find it on eBay.

Today I used texture linen cardstock from yesterday posted card for square background part. The card is very light blue color. I sponged the night of navy, marina mist and elegant eggplant on the top of card to make night sky. Then I splashed the white paint on it. But I felt it was not white enough, so I used the white gel pen to make it more bright.

I die cut the house and glue the yellow paper on the back. It looked light on inside. I used the foam square to stuck it on the background part.

Then I cut square die frame many times. I glued all frames together to make dimension. I wanted the frame was higher thank house part.

Supplies that I used:

Stampin Up Hearts Come Home stamp set ---coming soon ( I will update link when it is available)
Stampin Up Sleigh Ride ---Retired
 

Tuesday, August 22, 2017

Joy to the world -- hot glue paint


Recently I had ton of surplus paper that was cut to any shape. So I decided to use some to make a card today. Also I wanted to try hot glue paint.

This is one layer card. The cardbase is heavyweight linen texture light blue cardstock that I die cut a square for other use.

On the piece of watercolor paper I made the background color first. I inked color on the acrylic block. Sprayed some water. And put this acrylic block on the watercolor paper. Took off until it's dry.

Then I drew hot glue on it. Waited a little bit time. I used watercolor to color the hot glue.

I stamped the sentiment and dots on the cardbase. I glued watercolor paper under the square part that looked like a window. Trimmed the edge.

Supplies that I used:

Monday, August 21, 2017

Roses-- one die two cards


I used one die made two cards.

First card: I die cut the rose flower and colored by Faber castell gelato. And glued on the embossed cardstock. It's very simple but beautiful card.

Second card: this card is shaking card.

1. I used the negative parts of first card. Using die for guide to glue all pieces on the acetate.
2. Used the Nuvo embellishment mousse to color flowers and left cards.
3. After dry, I used foam tape to mount the card to make shaking space. Added sequins on the cardbase. Then put two pieces together.

Supplies that I used:

Friday, August 18, 2017

Forever


Now I know challenge is really challenge. My Facebook group has 15 days 15 cards challenge. Today is third day. I started to feel pressure. I told myself "You can do it." Even I know I will be getting more and more busy with school starting next week. Anyway, I do my best.

I had this card's idea long time ago. I don't know why I delayed to make this card until today. I used stamp set Always & Forever.

I stamped the wood on the whisper cardstock by early espresso. Then I used watercolor brush to color the wood by crumb cake. I used the real red to color the hearts and added the gloss accent. After coloring, I fussy cut the wood.

I took other white cardstock. I used the post note to cover the card to make sky and meadow.  Marina Mist for sky and Pear Pizzazz for meadow. When I sponged the color for sky, I used the MFT cloud stencil to add some cloud in the sky.

Finally I glue the wood on the card and stamped the heart above it. At the end I stamped the sentiment on the card.

This is what I made today. Hope you like it.

Supplies that I used:

Thursday, August 17, 2017

Hope it's a wonderful day in your...


When I first saw somebody made a winter card by using this Lovely as a Tree stamp set, I fell in love with it. But after I bought it, I only used it once as Christmas cards for teachers. Until yesterday  for a group challenge, I decided to use it again. So this was I made today.

Last time I made a winter card, white and snow winter time. Now it's summer, I wanted made something different. I looked out of window. It's cloudy. It's humid and hot day. I thought I really wanted that rain could came to drop the temperature. But I waited all day, it's still no rain. Then when I made this card at the end, I sprayed sparkling shimmer on the all of card. It looked like wet water on it. So I thought rain was in my mind. I calmed down to enjoy my card.

This card was easy to made. I stamped the trees first. Then I stamped some leaves under the tree by second generation stamp. I wanted just light leaves for background.

Second I started to sponged color on the sky and ground. Then I used Q-tip to add shadow under the tree. I wanted them standing there not floating in the air.

At the end I sprayed sparkling mist on the card. And tapped a paper towel to absorb it. The card looked like had rain scene. I was satisfied. I used stitched rectangle die cut it a little smaller than cardbase.

Finally I glued it on the cardbase. Simple! Done!

Supplies that I used:
Sentiment from Stampin Up host stamp set In the City

Tuesday, August 15, 2017

Amazing


Since I watched Barbara Grey's videos, I was attracted by her amazing works. I checked her UK website, joined the stamp club and sent my order. It's amazing. I started my international shopping. I received my happy mail last week. I chose this my favorite stencil and stamp set to create my card.

I will say the stencil is quite large then I thought even I know the its size measures. But I like what I made. I copied Barbara 's idea to make mountains and flying boy.

I left the stencil over the white cardstock and used the mask tape to stick both cardstock and stencil. My old makeup brush became my favorite tool for background coloring. For ink I chose the Distress ink.

I tore the copy paper to make the mountain from bottom to center. Color was from deep to light. I punched a 1"circle on post note paper and stuck the position that I wanted it was sun. Then I started to build sky.

After this, I took off stencil. I stamped the flying boy, birds and sentiment.

I paint the canvas panels night blue color for background. And glue the my work on it.

Supplies that I used:

Monday, August 14, 2017

Hello sunshine


Come with BoHo flower kit from Gina K. Designs, I also bought some other stamp sets. Theresa Momber is one of my favor designer. I like to watch her videos. She made wonderful scene cards.
I always tried to copy her card. But I am still learning.

Today's card I used her designed tropical skies stamp set. I didn't use sponge for coloring like her. I chose to use my new Dr. Ph. Martin watercolor. I will say this watercolor set is so good and easy to apply. Special for me, I don't have many experience for watercolor. But I do love watercolor paint. Maybe because it's closed to traditional Chinese paint.

I used the thick watercolor paper and stamped large frame stamp with coconut(or plum) trees. I wet the all white area first, then added colors. After dry, I added second time colors. This time I used the sticky note pad to cover lower part of card. I colored mountain by light navy blue color.

After my card totally dry, I stamped small island used second generation stamp technique to light it. It looked far form me. Also I stamped sea birds and sentiment.

I didn't want to keep the frame on this card. So I trimmed four edges. I glued card to black cardstock, just left a tiny edge that you can see. Then used foam tape to mount on cardbase.

Supplies that I used:

Thursday, August 10, 2017

You are so amazing


Today I is my secondcard that I make by flower stencil and BoHo kit from Gina K. designs. I feel I always like to make some cards using the same stamp/die/stencil. After several times, I stopped and moved to new things.

I tried using different technique to make card this time. I saw Stamp TV's the new challenge is about doing Gradient Background. I thought I could try it. This is a one layer card.

First, I die cut a you from BoHo kit as a mask. Then I used the mask tape to cover the four edges of card. I also stuck the you on the card with removable glue tape. 

Next, I covered the flower stencil on the card. I still used my old makeup brush to add the color on the card. I felt the soft makeup brush was so easy to control. I didn't care the color was lighter than by sponged. The picture didn't grab the best color. The actual card are soft and beautiful. 

After adding color, I moved the stencil and mask tape. Also I moved the die cute piece you. I stamped the you by black ink on the die cut position. It was perfect match. 

I stamped the are so amazing on the black card stock and embossed with white embossing powder. 

Finally, I glued the shiny stone on the center of flower. 

Supplies that I used today:

Wednesday, August 9, 2017

You make me simle


I received my order from Gina K. designs new release yesterday. BoHo kit is very cute and useful. Special I liked big You and sentiment so much. It is very useful. I can use it anywhere. Also big You die is wonderful match with boho stamp set.

So today I decided to use this You die and other stencil that I bought to make a card.

First, I used the NUVO Embellishment Mousse and stencil to make beautiful and shiny background. After it dry, I used my old makeup brush dust some match color from Distress Ink on the card. Because I didn't like the blank space to bright white. I liked it was soft.
Then I die cut the big detail You on black cardstock. I cut four times. Then I glued them together. I wanted to make a dimension but I couldn't use the foam tape because it was too thin. Four layers was good enough.

I stamped the "make me smile" on the black cardstock and used white embossing powder to embossed it.

I felt I didn't like the edge. After using mousse, the edge looked too rough. So I decided to add a frame on it. It felt much better.

All cardstock I used from BoHo kit.

Supplied that I used today:

Monday, August 7, 2017

Thanks for always being here


Since last time I used my old makeup brush to create the card " Enjoy your vacation", I found old makeup brushes were good to use on a card making. It blended very well.

Today I used this technique again. I chose Gina K. Designs the Through Thick and thin large flower stamp to make today's card.

Today I had a tip for embossing. I used two layers embossing power for my card. I put my cardstock in a Mini Misti.  I stamped by versamarker ink pad for embossing. First layer, I used the white embossing powder and heat it to stay. Then I stamped by Versamarker Ink Pad again to emboss second layer. For second layer, I used the Ranger Holographic embossing power to add shiny on the flower. It's hard to show on picture, but it's very pretty on actual card.

After heat and embossing, I started to add color to my card. I used the Distress Ink Aged Mahogany and Peeled Paint to color my card.  For flower, I started the center to edge. The color changed from deep to light. For leaves, I started the top edge which is close the flower.

After all, I stamped the sentiment and added the Nuvo Jewels Drops on the card. I mounted it to a Gina K. black onyx cardbase.

This card is simple but pretty.

Thursday, August 3, 2017

Happiness


Yesterday was a rainy day in here. It was a happiness day because cool temperature is how nice and rare in hot summer place. I was enjoyed and happy to make cards in this nice day.

I didn't think too much before I grabbed this flowers stamp. I knew I liked it very much. This was second time used it. Last month I used it made a card "you brighten my day".

I used the 5x5 Gelli gel plate to make this background. I put my Gelli in the Misti. I added distress ink broken china, mowed lawn and worn lipstick on the Gelli. Splashed water on it. Then put the Gelli gel printing plate on the card, looked like using Misti to stamp a image by ink. I didn't this twice. I used watercolor paper.

I waited it dry thoroughly. Normally I don't use heat gun to dry a card except  I want a splashed result  or I am hurry to do something. But mostly it can't happen because I will leave it for later. I am enjoyed card making, not have to finish the product.

After dry thoroughly, I cut th paper to 4x5.25. I left the below edge. I stamped flowers on the card and added clear embossing powder to embossed. I want my flowers shiny bright and a little pop out. I added the Nuvo jewel drops on the center of flowers. I used foam tape to mount the sentiment. Also I used the blueprint colored the edge.

Supplies that I used:
R112 Ranunculus Field by Stampendous
Gelli gel printing plate http://amzn.to/2wp73qP
Distress ink blueprint sketch, broken china, mowed lawn and worn lipstick
Ranger clear embossing powder http://amzn.to/2u7WqMc
Versafine black ink http://amzn.to/2v0v2Pd
Nuvo jewel drops http://amzn.to/2waCHJ0
Strathmore watercolor paper http://amzn.to/2u8arJJ
Neenah classic crest white #110 http://amzn.to/
Tim Holtz big chat http://amzn.to/2vmvOqL

Wednesday, August 2, 2017

Magic


Couple days ago when I was looking around card making videos on YouTube, I found Clarity YouTube Tuesday. I was attracted by Barbara Grey. She has amazing technique. Today's card is what I learned from her video Alium https://youtu.be/i0-ASamUovA

This is quite simple card, but result is so amazing.

I cut a piece of double side adhesive sheet to 3.75x5. I took off one side cover sheet and directly stamped image on the adhesive surface. I used Ranger Archival Ink. Then covered by acetate. Turn over and cut the acetate to fit the card size.

I mix gold, silver and copper colors of Nuvo Gilding Flakes in one box.  I took off other side adhesive cover sheet. I covered all adhesive surface by those mixed flakes. Then rubbed by my finger. I put the extra flakes back to the box for next time use. And then I dusted the surface of card by a brush. Turned over I saw this amazing result.

I used double side adhesive tape to add to a black cardstock and white cardstock. Amazing!

Supplies that I used:
Magenta paper lanterns https://www.magentastyle.ca/store/product_info.php?cPath=1_291_2_209_213&products_id=9353&osCsid=dru33qld2cb2c570sf9kk2ic91
Elizabeth craft designs clear double side adhesive sheet http://amzn.to/2uYZI1x
Nuvo gilding flakes http://amzn.to/2viJenx
Ranger archiveal ink plum http://amzn.to/2uWH8sr
Tim Holtz big chat http://amzn.to/2viZ4i1
Neenah classic crest white #110 http://amzn.to/2hno1D9
Gina K designs black onyx cardstock http://www.shop.ginakdesigns.com/product.sc;jsessionid=A72AAAAD38A9FE40B35660E8E883603B.p3plqscsfapp001?productId=1506&categoryId=292


You may also like:

Related Posts Plugin for WordPress, Blogger...